text to image creator — free online design tool

Design eye-catching text images in seconds

1080 × 1080
Text
Line 2 Style
Different font and color for the second line of text.

How to Create a Text Image — 3 Easy Steps

1

Choose a Style or Build from Scratch

Scroll the preset bar at the top of the tool and click any style you like. It loads a complete design instantly — font, colors, effects, and background all ready to go. You can then customize any part of it. If you prefer to start from scratch, skip the presets and set everything yourself from the panels on the left.

2

Customize Every Detail of Your Design

Use the four control panels to adjust everything. Text panel: type your words, choose font, size, weight, and alignment. Style panel: pick your color mode — solid, gradient, rainbow, or per-character. Effects panel: add neon glow, shadow, stroke, 3D extrude, or bubble. Background panel: pick a color, choose a gradient, or upload your own photo. Drag the text anywhere on the canvas and resize it with the corner handles.

3

Download and Share Your Creation

When your design looks right, click the Download button above the canvas. Choose your format — PNG, JPG, JPEG, or WebP. Your image downloads at full canvas resolution. No watermark. No sign-in required. Share it on social media, use it as a thumbnail, or add it to any project.

What is Text to Image Creator?

Text to Image Creator is a free tool that lets you design beautiful images from text — right in your browser. You do not need Photoshop. You do not need Canva. You do not need any design experience at all.

Type your text, pick one of 47+ creative styles, and your image is ready. Add glow, 3D effects, gradients, and custom backgrounds. Move and resize your text by dragging it on the canvas. When you are happy with your design, download it as PNG, JPG, JPEG, or WebP in one click. It is free, fast, and nothing is uploaded to any server.

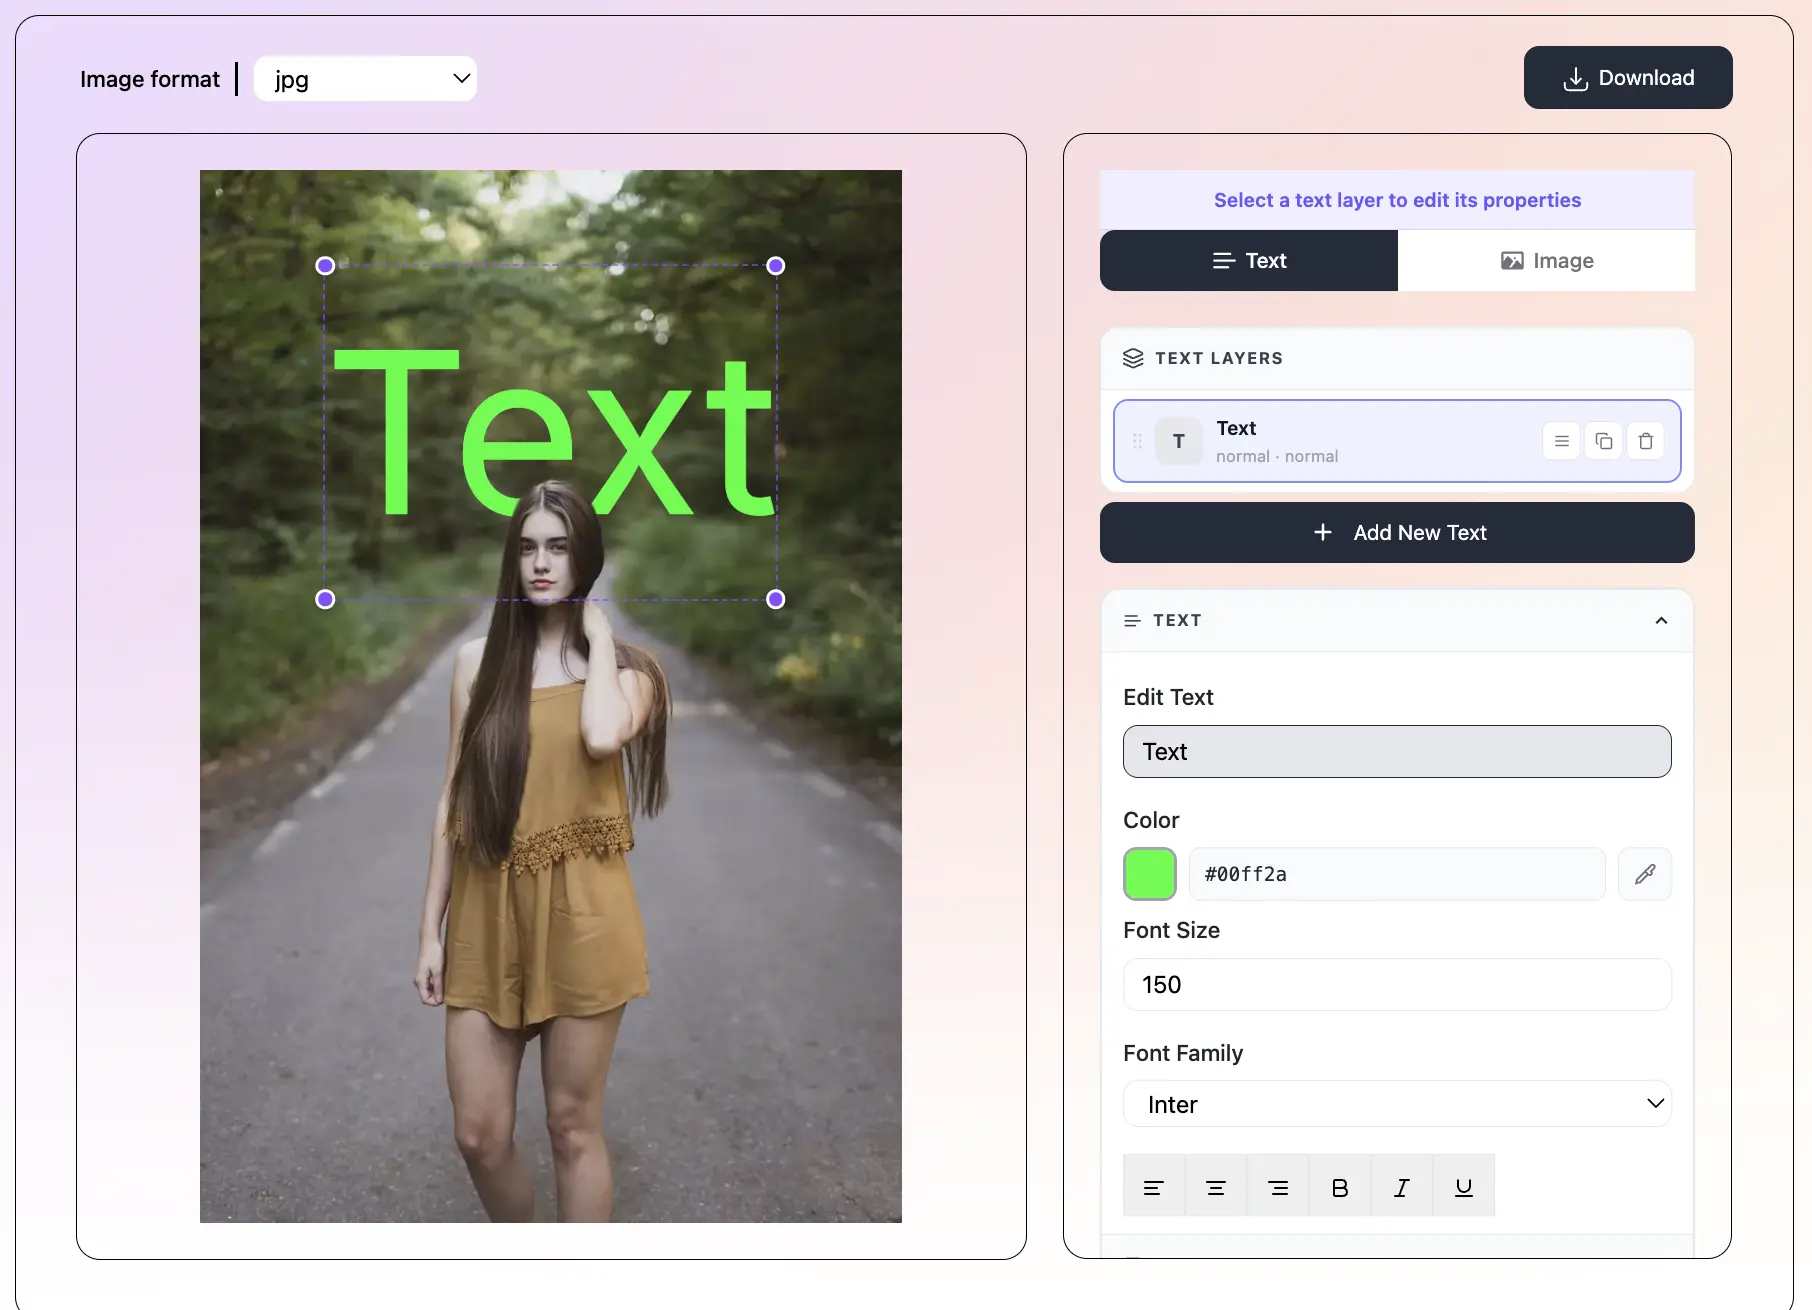
Text behind image editor — tool interface preview
47+ Creative Presets to Start With - text behind image feature

47+ Creative Presets to Start With

Choose from 47+ one-click styles — Neon Glow, Fire, Ice, Gold, Vaporwave, Cyberpunk, Galaxy, Retro, Rainbow, Pop 3D, Emboss, Script Studio, Colors Pop, and many more. Every preset is a complete design you can customize from there.

Neon Glow, 3D Extrude & Bubble Effects - text behind image feature

Neon Glow, 3D Extrude & Bubble Effects

Add six different text effects: neon glow, drop shadow, stroke outline, 3D extrude (block depth), bubble highlight, and colored text background. Stack them together or use just one — your design, your choice.

Full Color Control — Per-Character & Gradients - text behind image feature

Full Color Control — Per-Character & Gradients

Pick a solid color, smooth gradient, automatic rainbow, or give each letter its own color. Set word colors too — different shades for each word. The gradient editor lets you blend any two colors at any angle.

Upload Your Own Background Photo - text behind image feature

Upload Your Own Background Photo

Use a solid background color (150+ choices), one of 40+ gradient presets, or upload your own photo. After uploading, adjust blur and overlay opacity to make your text pop against any image.

Drag & Resize Text on the Canvas - text behind image feature

Drag & Resize Text on the Canvas

Click and drag your text anywhere on the canvas. Pull the corner handles to make it bigger or smaller. This gives you full control over the placement without typing any numbers.

Free Download — PNG, JPG, JPEG & WebP - text behind image feature

Free Download — PNG, JPG, JPEG & WebP

Download your finished design in any format you need. PNG for sharp edges, JPG and JPEG for small file size, WebP for the best quality-to-size ratio. No watermark. No limit. Completely free.

Frequently asked questions

You can create a wide range of things: YouTube video thumbnails, Instagram quote cards, neon sign graphics, gaming channel banners, motivational wallpapers, logo-style word marks, event announcement posters, TikTok story overlays, retro poster art, and more. Any time you need text that looks designed rather than just typed, this tool can help you make it in minutes.

The presets cover many different visual styles. Some of the most popular ones: Neon Glow (bright glowing text on dark background), Fire (red-orange gradient with glow), Vaporwave (pink and purple retro gradient), Cyberpunk (yellow on dark with glow), Galaxy (purple cosmic gradient), Pop 3D (colorful letters with a 3D extrude), Emboss (gray raised letters on gray background), Neon Sign (script font with intense glow), Year 3000 (green pixel text on dark), Script Studio (elegant handwriting style), Colors Pop (each letter in a different bright color), and many more. Every preset is fully editable after loading.

The neon glow effect draws several layers of blurred light around your text, one on top of another, to create the look of a glowing neon tube. You can set the glow color (it does not have to match your text color), the glow size (how far the light spreads), and the intensity (how many layers of glow are added). A strong glow on a dark background looks like a real neon sign. A softer glow on a lighter background creates a subtle halo.

There are seven ways to color your text: (1) Solid — one flat color for all text. (2) Gradient — a smooth blend between two or more colors, with adjustable angle. (3) Rainbow — the full color spectrum cycling through each letter automatically. (4) Custom per-character — you pick the colors, one for each letter position, and they repeat through the text. (5) Word colors — each word gets its own color. (6) Outline — no fill, just a colored border around each letter. (7) Gradient outline — a gradient-colored border with no fill.

The 3D extrude effect adds a block of color behind and below (or in any direction) your text, making it look like the letters are three-dimensional objects with depth. You can control the depth (how thick the 3D block is), the color of the extrusion, and the angle (which direction the shadow block falls). It works best with thick, bold fonts like Bebas Neue, Montserrat Black, or Russo One.

Yes. In the Background panel, click the Image tab and choose a photo from your device. The photo fills the canvas behind your text. You can then use the Blur slider to soften the photo so the text stands out more clearly, and the Overlay slider to add a dark transparent layer on top of the photo for even better text contrast.

After you set up your text, you will see a dashed selection box around it on the canvas. Click inside the box and drag to move the text anywhere on the canvas. Drag any of the four white corner circles to make the text bigger or smaller. This works with mouse on desktop and with your finger on mobile. Click the Reset button in the top bar to bring the text back to the center.

Line 2 Style lets you give the second line of your text a completely different font, size, and color from the first line. This is useful when you want a big bold headline on the first line and a smaller script subtitle on the second line — a common style in motivational posts, event graphics, and YouTube thumbnails. Turn it on in the Text panel, then type your text on two lines by pressing Enter.

For Instagram feed posts, use 1080 × 1080 px (square format). For Instagram Stories and Reels, use 1080 × 1920 px (vertical format). Both are available as one-click presets in the Size panel. Instagram will compress images when you upload them, so using the right resolution means your text stays sharp and readable.

PNG is a lossless format — it keeps every detail perfectly and is the best choice when you want the sharpest text. The file size is bigger. JPG and JPEG are the same format (JPEG is just the full name) — they compress the image to make the file smaller, with a small loss in quality. Great for sharing on social media where file size matters. WebP is a modern format that gives you near-PNG quality at a much smaller file size — it is usually the best choice for web use. All formats download at full canvas resolution.

Yes. The tool works on any modern mobile browser — Safari on iPhone, Chrome on Android, and others. The control panels stack below the canvas preview on small screens. Dragging and resizing text also works with touch. For very detailed adjustments, a larger screen is easier, but you can create and download complete designs on a phone.

Canva and Adobe Express are general design tools with templates for many types of content. This text to image creator is built specifically for one job: creating text images with advanced text effects like neon glow, 3D extrude, bubble, and per-character colors. Everything loads instantly with no login. There are no templates you have to pay to unlock. And because it runs in your browser with no server uploads, it is completely private.

What People Create With This Text to Image Creator

People use this tool every day for a huge range of projects. Here are some of the most common things they make — and tips for how to make each one look great:

YouTube thumbnails. Bold, high-contrast text on a dark or colorful background. Use a preset like Cyberpunk, Neon Glow, or Year 3000. Pick Bebas Neue or Montserrat Black as the font. Keep the text to five words or fewer. Use the 1280×720 canvas size.

Instagram quote cards. Clean, readable text on a solid or gradient background. Try the Minimal, Glossy, or Script Studio preset. Use a script font like Dancing Script or Pacifico for the quote, and a plain font like Inter for the author name. Use Line 2 Style to mix two different fonts in one image.

Neon sign graphics. Bright glowing text on a black or very dark background. Load the Neon Sign or Neon Light preset and type your text. These look great for gaming channels, Twitch streams, and social media bios. Download as PNG for the sharpest edges.

Gaming graphics and stream overlays. Try the Cyberpunk, Galaxy, Vaporwave, or Year 3000 preset for a futuristic look. Use a techy font like Orbitron or Press Start 2P. Add a gradient and high-intensity glow for maximum impact.

Motivational wallpapers. Short, powerful text on a beautiful background. Upload your own photo, reduce its brightness with the overlay slider, and place your quote over it. Try Dancing Script or Cinzel for an elegant feel.

Understanding All 47 Presets

With 47 presets to choose from, it helps to know what each group is designed for. Here is a simple breakdown:

Dark glow presets — these use bright, colorful text on deep dark backgrounds with glowing light effects. Best for: YouTube thumbnails, gaming graphics, music content, anything that needs energy. Presets: Neon Glow, Fire, Ice, Cyberpunk, Galaxy, Neon Sign, Neon Light, Year 3000, Dazzle.

Bold 3D presets — these use thick, dimensional effects that make text feel solid and three-dimensional. Best for: titles, logos, posters, sport or fitness content. Presets: Pop 3D, Metal 3D, Puffy, Emboss, Rough Rock.

Colorful and playful presets — these use multiple bright colors, rainbows, and fun fonts. Best for: kids' content, celebrations, fun social posts, anything upbeat. Presets: Rainbow, Colors Pop, Love It, You Are the Best, Comic Style.

Minimal and professional presets — these use clean white or light backgrounds with subtle, elegant styling. Best for: quotes, announcements, business content, anything that needs to look polished. Presets: Minimal, Outline, Label, Script Studio, Easy Win, User Flow.

Retro and vintage presets — these use aged colors, classic fonts, and nostalgic looks. Best for: music content, lifestyle posts, art projects. Presets: Retro, Vintage, Chrome, Frozen, Shine.

Remember: every preset is a starting point. You can change any part of it after loading — font, colors, effects, background — until it looks exactly the way you want.

Color Modes Explained Simply

The color mode you pick changes how the colors are applied to your text. Here is what each mode does in plain language:

Solid color — every letter gets the same flat color. Simple and clean. Good for professional or minimal designs where the text needs to be very readable.

Gradient — the color shifts smoothly from one color to another across your text. You pick the start color, the end color, and the angle of the blend. Great for a modern, polished look. The fire preset uses a red-to-orange gradient. The ice preset uses light blue to white.

Rainbow — the colors cycle through the entire color spectrum, one hue per letter. The letters near the start of the word are red, moving through orange, yellow, green, blue, and purple. It looks festive and energetic. Good for celebration posts and fun content.

Custom per-character — you define a set of colors (up to five or six), and they repeat through your letters one by one. For example, colors red, orange, yellow would give you: R(red) E(orange) D(yellow) L(red) I(orange) N(yellow) E(red). Great for brand colors or controlled color schemes.

Word colors — each whole word gets a different color. The first word is color one, the second word is color two, and so on. Good for two or three word headlines where you want each word to feel distinct.

Outline only — the fill inside the letters is removed. Only a colored border around each letter is visible. This looks modern and graphic, especially on a colored or photo background. It works best with thick, bold fonts.

Background Options — Colors, Gradients & Your Own Photos

The background is half of your design. Getting it right makes the text look great. Here are the three background types and when to use each one:

Solid background color. A flat single color fills the whole canvas. This is the cleanest, simplest background. The tool includes 150+ solid color options organized by family — deep darks (black, navy, dark purple), vivid neons (electric blue, hot pink, lime green), neutral mids (warm gray, slate, brown), earthy tones (terracotta, sage, olive), and light pastels. If you want the background color to feel intentional, pick one that contrasts well with your text color. Light text on dark background — or dark text on light background — is always the most readable.

Gradient background. Two or more colors blend into each other across the background. The tool includes 40+ gradient presets in categories like dark/cosmic, sunset/warm, ocean/cool, pastel/light, and vivid. You can also set your own gradient colors and angle. A gradient background adds visual interest without competing with the text — especially if the gradient is relatively dark and the text is bright.

Photo background. Upload any image from your device as the background. This is powerful because you can combine your designed text with real photos. After uploading, two sliders appear: Blur (softens the photo so the text reads more clearly) and Overlay (adds a dark transparent layer on top to increase contrast). Most of the time, adding a small amount of both blur and overlay makes the text much easier to read.

Social Media Size Guide for Text Images

Using the right size for each platform is important. If your image is the wrong size, it may look cropped, stretched, or blurry. Here is a quick guide:

  • Instagram Feed Post: 1080 × 1080 px (square) or 1080 × 1350 px (portrait) — the square format is the most versatile
  • Instagram Story and Reels cover: 1080 × 1920 px (full vertical screen)
  • TikTok video cover: 1080 × 1920 px (same as Instagram Story)
  • YouTube video thumbnail: 1280 × 720 px (standard 16:9 widescreen)
  • YouTube channel art / banner: 2560 × 1440 px (use the custom size field)
  • Facebook feed post: 1200 × 630 px or 1080 × 1080 px
  • Facebook cover photo: 1702 × 630 px
  • Twitter / X header: 1500 × 500 px
  • Twitter / X post image: 1200 × 675 px
  • LinkedIn post: 1200 × 627 px
  • Pinterest pin: 1000 × 1500 px (tall vertical, use custom size)
  • Desktop wallpaper: 1920 × 1080 px

Text to Image Creator vs. Other Free Tools

There are many free design tools online. Here is an honest comparison of how this text to image creator is different from the most popular ones:

vs. Canva: Canva is a full general-purpose design tool with thousands of templates. It is great if you need to lay out complex multi-element designs. But its text effects are limited — no real neon glow, no 3D extrude, no per-character colors. This tool goes much deeper on text styling. It is also faster to use when text images are all you need — no blank canvas, no dragging elements around, just type and style.

vs. Adobe Express: Adobe Express is similar to Canva — template-based with many layout options. The text effects are basic. Some premium features require a subscription. This tool is 100% free with no locked features and no signup.

vs. PicsArt or Snapseed: These are photo editing apps focused on manipulating photos. Text is a secondary feature. They do not have glow, gradient, per-character colors, or preset styles built for text images specifically.

vs. Word Art generators: Old-style word art tools create text shapes and decorations but lack modern effects like neon, 3D, gradients, and custom backgrounds. They usually produce low-resolution images not suitable for social media.

This text to image creator is built for one specific job: making text images look great, quickly. If that is what you need, it is the right tool for it.

More free tools to try

All free, no sign-up — same photo works across every tool

Recent Posts

🔖

Save TextBehindImg

Press Ctrl+D (or ⌘D on Mac) to bookmark and come back anytime it's free forever.